

Latte macchiato succeeds when you hit 65°C (149°F) milk temperature and pour the espresso as a thin stream into the center of the milk, keeping the two layers separate. If your milk is hotter than that, the foam collapses faster. If you pour the espresso from too high or too slowly, the layers blur.
Latte macchiato recipe, at home: warm milk, then texture to silky microfoam (about 2 to 3 cm foam for a 250 ml glass). Fill a tall glass with 200 ml milk, hold it around 65°C (149°F), start the espresso shot (single or double), then pour espresso into the middle so it “stains” down the milk. Serve immediately after pulling the shot.
How To Make Latte Macchiato? Step-by-step Recipe
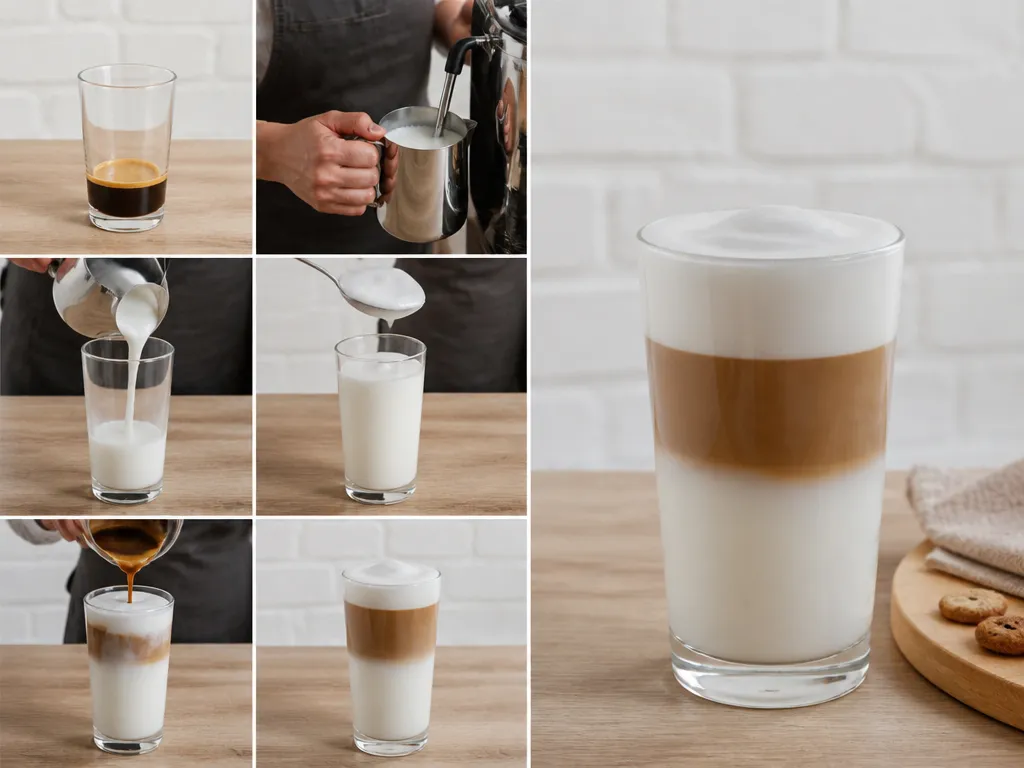
Use a tall 250 to 330 ml glass and build 3 layers: pour steamed milk into the glass first, then add an espresso slowly, and finish with a thin foam sheet. For a reliable home result, start with 18 g espresso (double), 180 to 220 ml milk, and foam that is about 1 cm thick after settling.
Glass, Dose, And Milk Targets (Repeatable Starting Point)
Latte macchiato needs height. Pick a clear glass that holds at least 250 ml so the espresso and milk can separate before they mix.
For espresso, choose either single 9 to 10 g or double 17 to 20 g in the basket. For home consistency, I recommend the double, because it is harder to end up with watery espresso when milk is added.
| Target | Recommended home spec | What changes it |
|---|---|---|
| Glass size | 250 to 330 ml tall glass | Smaller glass increases mixing and reduces separation |
| Espresso dose | 18 g (double) | Use 9 to 10 g if your machine struggles with doubles |
| Milk volume | 180 to 220 ml | More milk gives higher layers, less milk tightens the layers |
| Foam thickness (after settling) | about 1 cm | More foam makes layers blend faster |
Equipment And Exact Build Steps
Latte macchiato is mostly a pouring-and-steaming workflow. Use a portafilter or espresso machine, a milk pitcher with a spout, and a thermometer if you want repeatability, though you can also steam by feel once you practice.
For foam quality, aim for microfoam that looks glossy and pours like wet paint. Dry foam piles up and kills the clean layer effect.
Judgment call: if your first attempt blends, do not change both espresso and milk at once. Keep your espresso dose constant (18 g double) and correct only the milk pour speed and foam amount first.
Layering Mechanics For Latte Macchiato
Latte macchiato layering works because warmed milk is less dense than espresso, so the coffee sinks while the milk stays on top during a controlled pour. Milk-first pouring also lets you anchor a calm base layer before the espresso hits it with momentum.
At home, you control separation with two knobs: temperature and pour energy. Hotter milk tends to have lower density than cooler espresso, and a gentle, straight pour reduces turbulence that would mix the layers. If you hear or see the surface “roil” when espresso starts, you are adding energy that destroys the density boundary.
Density And Temperature Differences That Create Separation
Milk’s temperature and texture change how sharply it separates from espresso. Warmer, thinner milk settles more cleanly on itself, while very aerated foam traps air and makes the top layer unstable. Espresso temperature also matters because cooler espresso can thicken slightly and mix more easily at impact.
Use these practical targets for repeatability even without lab numbers. Aim for steaming milk that is hot enough to feel clearly warm, but avoid scalding and avoid over-aerating. After steaming, swirl the pitcher to fully combine microfoam, then pour immediately so the boundary forms while the milk surface is calm.
Milk-first Pour Establishes The Base Layer
Milk-first order is the simplest way to control the interface. Start by filling the glass with milk so the espresso enters a liquid body that can accept it, instead of striking glass and splashing upward. The goal is to create a quiescent milk surface, then introduce espresso with enough force to sink but not enough to churn.
Judgment call: if your milk has thick foam, skim or re-pour with less aeration. Clean layers beat volume every time.
| What you see | Most likely cause | What to change next |
|---|---|---|
| Layers blend quickly, uniform tan color | Espresso stream is too fast or hits the surface with too much energy | Pour espresso into the center with a thin, low, steady stream |
| Foamy top, weak stain pattern | Over-aerated milk (too much microfoam) | Reduce aeration, then swirl the pitcher before pouring |
| Espresso floats briefly or spreads | Espresso or milk temperature balance off, or milk surface disturbed | Pour milk first into a calm surface, then add espresso promptly |
In practice, glass size changes the feel of the pour. Taller, narrower glasses give you more vertical separation time, while short wide glasses shorten the window and make it easier to mix. For wide glasses, reduce pour speed and keep the espresso stream aligned to the center to preserve a sharp boundary.
Key Variables That Affect Result

Latte macchiato quality is controlled by four knobs: espresso strength (set by dose and extraction), milk texture (microfoam structure), milk volume (glass height), and drink temperature (stability during layering). The practical outcome is simple, stronger espresso darkens the “coffee” layer and dials up contrast, while better microfoam thickens the white layer and slows blending.
Espresso Strength And Dose Choices
Dial your espresso first, because it sets the visual “coffee” layer even if your milk is perfect. Choose a dose strategy that matches your roast and grinder consistency: lighter roasts generally need slightly more extraction to taste balanced, darker roasts can tip into bitterness faster, especially if you chase intensity by increasing dose.
Take a position: keep dose consistent and adjust strength with grind and extraction time instead of wild dose swings. When the espresso is weak, the coffee layer looks faint and the drink tastes hollow; when it is too strong or bitter, the latte macchiato becomes one note and the milk sweetness can’t rescue it.
Milk Texture Targets And Temperature Stability
Microfoam quality is the biggest driver of layer separation. Aim for foam that flows like wet paint, not like dry shaving cream, and stop steaming while the texture is glossy and unified.
Temperature is the second driver. If the milk is too hot, foam becomes looser and the white layer blends more quickly; if it is too cool, the drink can taste thin and the foam can look streaky because it has less time to hydrate and settle.
| Variable | What you want | What goes wrong |
|---|---|---|
| Microfoam | Fine, uniform bubbles, shiny surface, pourable silky stream | Large bubbles or dry foam collapse, blending layers |
| Milk temperature | Hot enough for sweet taste and smooth texture, stable during pouring | Too hot thins and mixes; too cool tastes flat |
Milk Volume And Glass Height
Use glass height to control proportions, not guesswork. For a tall latte macchiato glass, you have more room to form a thicker white layer before the coffee mixes through; for a shorter vessel, you need tighter consistency in both milk texture and pour speed.
Take a practical approach: start with a milk volume that fills roughly the middle of the glass after you account for settling, then keep it fixed while you tune foam quality and espresso strength. When your glass is smaller and layers blend, the most effective fix is better microfoam and steadier pouring, not reducing espresso strength.
Most common layering failure is texture first, not espresso. If your coffee is strong but layers blend, your milk foam is usually too airy (or too hot) for the glass size you are using.
Equipment And Settings For Latte Macchiato
Latte macchiato quality comes down to three controllable hardware settings: grinder repeatability, espresso dose and output consistency, and steam-wand technique that gives microfoam without scorching. Set up so you can measure dose and milk volume, then lock your grinder and steam routine before chasing “perfect layers.”
Grinder, Dosing, And Espresso Setup
A home grinder needs repeatable particle distribution, so pick a grinder with stable settings and avoid switching recipes mid-day without a reset. Use a scale, weigh your espresso dose, and keep your output measurement consistent so weak espresso and thin crema do not sneak in as “mystery problems.”
For dose, target a basket fill that makes tamping consistent, then confirm with a weighed dose each time. If your machine uses a pressurized or non-standard basket system, follow the manufacturer’s recommended dose range for that specific basket, since the exact grams-to-basket relationship varies by model.
Milk Pitcher, Thermometer, And Steam Wand Technique
Use a stainless milk pitcher that fits your steam wand reach, so the tip position stays stable while you texture milk. Choose a thermometer if you struggle to keep milk in the safe, sweet range, because texture collapses faster than beginners expect when milk overheats.
Steam technique is about creating microfoam with controlled vortex, then stopping before the milk gets too hot. Most “overly foamy” latte macchiato comes from too much air injection time, too high a wand position, or aggressive agitation after texture forms.
Tall Glass Prep And Cleaning Tools
Tall glass consistency is the hidden variable that decides whether espresso draws clean layers or smears across milk. Clean glass walls matter because residual oils and detergent film affect wetting and can break the sharp separation.
Use a dedicated towel and rinse step so no soap remains, then dry the glass exterior so you can see layer boundaries clearly. Keep a small brush and a damp cloth for purging the steam wand immediately after each milk texture, since dried milk residue bakes onto the metal and causes off-flavors and inconsistent steam.
Practical rule: if you cannot measure espresso dose and verify milk texture by temperature and consistency, you cannot reliably fix layer blending with pouring technique alone.
| Goal | What to set | Repeatability check |
|---|---|---|
| Defined layers | Consistent espresso output and steady milk microfoam | Weigh shots and verify milk texture (smooth, glossy microfoam) |
| Prevent weak espresso | Grinder setting that achieves stable extraction | Track espresso yield and adjust grinder one step at a time |
| Prevent overly foamy milk | Steam tip position and air-injection time | Milk should pour in a thin ribbon, then settle without large bubbles |
Pouring Technique To Build Defined Layers
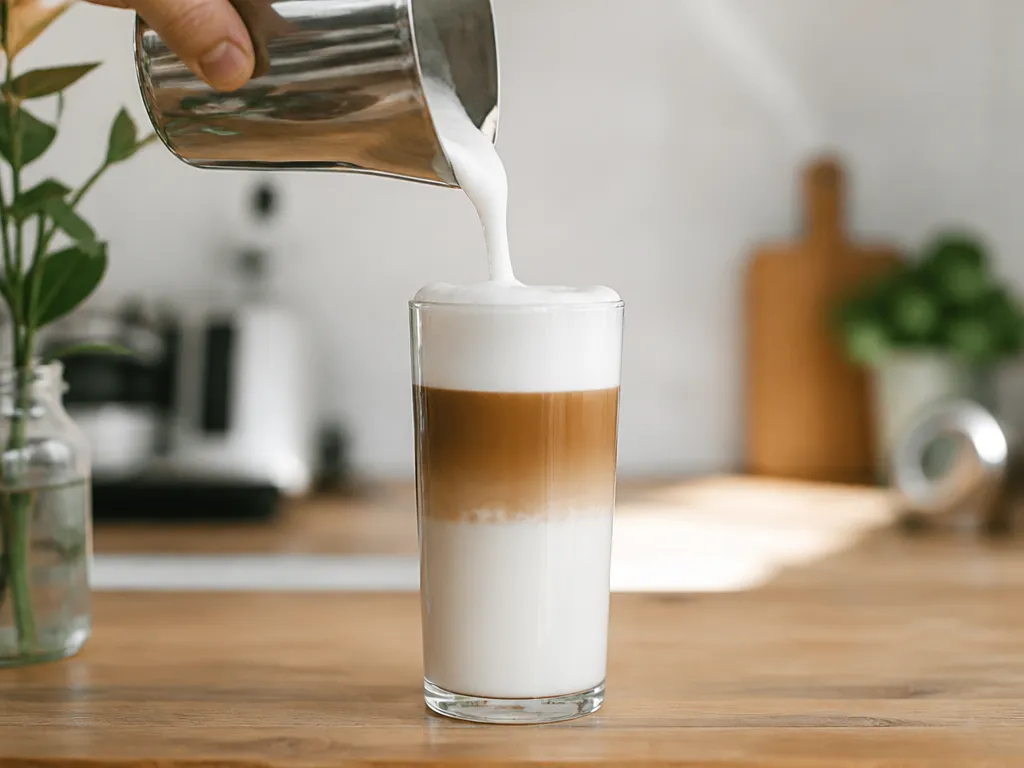
Layer separation is a pour-order problem before it is a skill problem: milk goes into the glass first, espresso goes in second, and a low, slow pour keeps the two from collapsing into one flat beige drink. Foam is mostly air, so espresso dropped onto it sinks through with almost no resistance. The liquid milk underneath resists that same movement, and the dark band forms at the boundary between them.
Everything below assumes the milk is already steamed to a thin, glossy microfoam and the espresso is fresh and hot. Stiff, dry foam or a shot that has been sitting long enough to go lukewarm will not hold clean lines, no matter how careful the pour is.
| Variable | Target | What it controls |
|---|---|---|
| Glass tilt | 30 to 45 degrees for the milk pour | Splash control and unwanted aeration |
| Pour height | 3 to 5 cm for milk, under 2 cm for espresso | Drop height is the main layer-breaker |
| Pour speed | Slow and steady, 4 to 6 seconds for the pour | Turbulence at the milk boundary |
| Rest between pours | 20 to 30 seconds | Lets the milk stop moving |
Three clean bands last roughly two to four minutes. After that, diffusion softens the edges and the drink reads as an ordinary milky coffee. Drink it from the glass, top down through the foam, without stirring.
If you change only one thing, change your pour height. Most home attempts fail because the pitcher sits 10 cm or more above the glass, and no amount of careful timing rescues layers that drop height has already destroyed.
Troubleshooting And Common Issues
Four variables account for nearly every failed latte macchiato: foam density, pour speed, espresso freshness, and temperature. Diagnose the variable, not the symptom. What you see in the glass tells you which one moved.
If the layers form and then blur after ten seconds, you have a pour problem. If they never form at all, you have a milk problem.
Layers Merge Into One Flat Brown Mass
Symptom: the espresso and milk blend almost immediately and the glass reads as a flat white. Cause: the stream hit the surface too fast, or the foam cap was too thin to slow the liquid down. Fix: pour into the center of the glass from under 2 cm above the foam, and keep the stream pencil-thin from start to finish.
Bad foam is usually a steaming fault rather than a pouring one. If your microfoam looks like dishwater instead of wet paint, pour it out and steam a fresh jug, incorporating air only in the first few seconds and then keeping the tip submerged so the milk rolls.
Espresso Sinks Below The Milk
Symptom: the dark band drops to the bottom and the foam sits straight on the milk. Cause: the shot lost its crema before pouring, or the stream broke through the foam cushion from too great a height. Fix: pour within seconds of pulling the shot, drop the spout to roughly a centimeter or two above the surface, and slow the flow further.
Weak, watery shots sink more readily than dense ones. If your espresso tastes thin, the grind is too coarse or the beans are old, and both problems show up in the glass before they show up on your tongue.
Foam Too Stiff Or Full Of Visible Bubbles
Symptom: a dry, marshmallowy head that sits on top instead of integrating. Cause: too many seconds of air stretched into the milk, or re-steaming milk you already steamed once. Fix: cut the air stage short, then spend the rest of the time texturing with the tip just under the surface. Tap the jug and swirl before pouring.
Whole milk is the most forgiving here because its fat and protein hold a finer bubble structure. Skim milk foams higher but dries out faster and collapses sooner in the glass.
Drink Goes Lukewarm Before You Finish It
Symptom: the first sip is right and the last one is cold. Cause: milk scalded past the point where it tastes sweet, or a cold glass pulling heat out of the drink. Fix: steam to roughly 55 to 65°C, warm the glass with hot water and dry it before you build the drink, and serve immediately.
Those temperature figures are the ranges home baristas generally converge on, not results from a controlled test, so treat them as a starting point and adjust by taste. Milk heated well past that point smells cooked and turns flat, which no amount of careful pouring will rescue.
Variations, Sizes, And Flavor Tweaks
Layer visibility in latte macchiato hinges on glass shape and size; a tall, narrow glass keeps the milk and foam separated from the espresso long enough to show distinct layers. Wide-mouth or shorter glasses invite faster mixing and blur the separation.
| Glass type | Layering outcome | Notes |
|---|---|---|
| Tall, narrow | Best three-layer visibility | Classic presentation, holds substantial milk |
| Medium height, straight sides | Good separation but less dramatic | Balanced for everyday use |
| Wide mouth | Low layering visibility | Quicker blend, cappuccino-like feel |
Glass is half the trick; the rest is precise pouring and timing to keep the bands intact.
Quick Summary
The answer is that a stable latte macchiato hinges on hitting 65°C milk, pouring espresso as a thin center stream into about 200 ml of milk in a tall 250 to 330 ml glass, and serving immediately after pulling the shot to keep distinct layers and a glossy microfoam, because hotter milk collapses the foam, pouring from too high or too slowly blurs the layers, preheating the glass helps maintain separation, and for home consistency a double shot of 18 g is recommended.
Four conditions would change that answer in practice: the milk temperature must stay around 65°C, because hot milk above this threshold makes the foam collapse faster; the coffee dose matters, with 18 g double recommended and 9-10 g if your machine struggles, as a weaker shot can blend with milk; the glass size affects separation, with a tall 250 to 330 ml glass preferred while smaller vessels increase mixing; the milk volume ranges 180 to 220 ml, where more milk favors higher, clearer layers and less milk tightens the separation. Preheat a tall glass.
Frequently Asked Questions
How Much Does It Cost To Make Latte Macchiato At Home Per Cup?
You can estimate costs by equipment ownership; if you already have an espresso machine and milk, you can make it for under $1 per cup. If you need to buy gear, the upfront cost is higher but per cup remains low once you amortize it over several drinks.
How Long Does It Take To Make Latte Macchiato From Start To Finish?
Plan about 8 to 12 minutes from start to finish; espresso pull takes 25-30 seconds and frothing adds roughly 60-90 seconds plus assembly time.
Can I Use Non Dairy Milk Or Decaf And Still Follow The Same Latte Macchiato Method?
Yes, but non dairy milks froth differently, so you may need to adjust steaming time and foam texture; decaf uses the same technique, but the flavor will be milder.
What Happens If You Skip The Foam Or Other Steps During The Process?
If you skip the foam or mispour, the drink will be flatter and the layered look will fail; aim for foam that makes up about one third of the cup to maintain the visual separation.
When Should I Seek Professional Help And How Can I Verify Latte Macchiato Claims On My Own?
If you cannot get consistent results after five attempts, consider a barista lesson or equipment service. To verify a claim, reproduce the method on your own setup and compare the result to a standard three layer look, checking the layer order and foam height as a practical test.

- Espresso Bar Wedding: Ideas, Setup, Costs, and Tips for a Memorable Coffee Experience - November 11, 2026
- How Many Grams of Espresso Beans for a Double Shot? A Complete Brewing Guide - November 11, 2026
- Brasilia Espresso Machine: Features, Performance, Models, and Buying Guide - November 11, 2026